fun with charts
alternate chart collage.jpg

Once upon a time (I think January 2018 to be quite exact) I promised to share a new chart option for my Sophiasburgh Sweater pattern. And then many, many months zoomed by and I forgot all about said chart. Maybe, maybe I can blame this forgetfulness on the seasons? The sweater that I knit using this alternate chart has a bit of a holiday vibe, so the sweater was tucked away when there was still snow on the ground, and I’ve only just pulled it out this weekend. Which helps explain why I finally managed to remember my old promise!

So here is the promised alternate chart from last winter. If you have the Sophiasburgh Sweater pattern, it’s as simple as using this chart in place of the one that’s already in your PDF. The stitch counts are the same, and it’s still a two-colour design. I simply needed a little variety in my own closet, and thought it would be fun to work within the same math guidelines. The resulting design does have a holiday-inspired quality - a bit like a garland hanging on a fireplace with twinkle lights circling around it. But to be fair, I have only tried the chart with a deep red and soft grey colour combo, and it would be great to see how it knits up in other palettes. I’m guessing the design could highlight all sorts of seasonal stories!

alternate yoke chart.png

I hope this is a fun option to have - and definitely share your projects if you decide to use it! I’m SO excited to see how the chart comes to life in your favourite colours. I’ve already started researching new colours too…now that this sweater is back on my mind, i just can’t help it. :)

stitch single.png
brae cove tunic
brae cove alt.jpg

Gosh, I’m a little rusty at this blog post writing thing. Years ago, I wrote often enough that I wasn’t critical of every single word. That isn’t the case right now, but there’s only way to get over it: write, write, and write some more.  

So, putting aside writing style for a moment, here is what I’ve been trying to get onto the page: a little over a week ago the Brae Cove Tunic knitting pattern was released. From the very beginning, it was an amazing-magical-stars-bursting-everywhere kind of collaboration that Elizabeth from Squam Art Workshops imagined into being. And along the way, we worked with more incredible women who added encouragement, frankness, and friendship to the project, making the end result that much sweeter.

Wait! I could probably have said that in two words: dream project.

As this dream project evolved, I thought often about collaboration. There is a particular magic that happens when you work with other people on a creative project. When you collaborate, you get the chance to hear new perspectives, opinions, even vocabulary. You see someone else’s visual preferences, see how those preferences nudge your ideas in a new direction. You learn from one another, and in the process, begin to recognize your own strengths and skills.

I feel lucky that I had the chance to learn about the magic of collaboration early in my “day job” career. There was a time when we brought specialists together to build on ideas and execute the best creative we possibly could. But with technology at our fingertips, and timelines and budgets always shrinking, it has gotten harder and harder to justify using a team of people to build a single piece of creative. Instead we often ask one person to create from start to finish, and although it can totally work sometimes, I think we might be losing more than we are gaining. In the final days of wrapping up the Brae Cove Tunic, I remembered just how much a collaborative spirit can influence the final execution. Without a doubt, this project as a whole is much greater than the sum of its parts. The combination of people, skills, and design perspectives adds an extra layer of magic that simply could not have been created by one person alone.

Dream project indeed.

ravelry 8.jpg
Samantha Lamb Comment
south bay sweater
south bay collage.jpg

Wow, so that happened. 

My first sweater pattern is out there in the world! This was a long time in the making, but SO worth it. The backstory is this: when Karen hosted the top-down #fringeandfriendsKAL in 2016, I was sewing tank tops with a little bit of gathering right at empire waist height. I saw the challenge as a great way to adapt the same feature into a sweater. Armed with some gorgeous hand-dyed cormo from Wing and a Prayer Farm, I set about playing with the design. It definitely took a number of attempts (doesn't every design? I think 3 times is my norm!) but eventually it worked out and I quickly followed up knitting another version in Quince + Co Owl. This time I added a cowl neck, which has turned out to be a great option.

Fast forward through a year of finding grading help (at the time I didn't trust I could do it), going through endless rounds of tech edits (which involved learning A LOT about grading) and finally working with the best bunch of test knitters around. Which all led to launching the pattern for real just a few days ago. Phew!

The pattern is available on Ravelry, and now that I've seen all these other versions finished, I am itching to start a new one in a heathered grey. Perhaps 2018 is the right year for hosting a KAL?


Samantha LambComment
ann carolyn smock
ann carolyn collage.jpg

Freshly washed dobby + the urge to sew from a purchased pattern = a finished Ann Carolyn Smock shirt!

I had picked up Ellen Mason's Ann Carolyn Smock pattern last year at the Squam retreat because one of my cabin mates had been wearing a fantastic version and then I met the lovely Ellen in person. And in one of those weird coincidences that makes the world seem very small, as I was looking at the fabric options in The Workroom for this pattern in particular, another customer was talking to her friend about using one of Ellen's patterns and then working with Ellen's wool (and it isn't like we have access to Ellen's patterns or wool in Toronto). Clearly I took this as a sign that I was supposed to sew this smock right away.

I did make a couple of modifications, though the fabric might be the most obvious. In the fabric photo at the top, you're seeing the right side of the fabric with its fluid scalloped pattern of dots. But after washing, I actually liked the wrong side better because it was darker and more subtle. As for pattern modifications, I used the large pattern sheet to grade a smaller size by hand right on the paper (love those large paper sheets for being able to do this!). After that, I just traced my pattern pieces using tracing paper to keep the pattern intact (in case my hand grading went horribly wrong). I had learned a couple of things from doing a muslin first, mainly that I needed to remove some fabric from the back piece and a little from the back seam of the sleeves. Pretty simple to do, and now it fits perfectly. And I loved trying shoulder darts! I had to move them forward by 1/2" based on the other modifications, but they are pure magic.

If you're looking for a comfortable and cute shirt/dress pattern - definitely give this one a try. I'm already sorting through fabric options in my mind for a breezy, springtime dress version...

Samantha LambComment
kids snappy shoulder vest
snappy collage.jpg

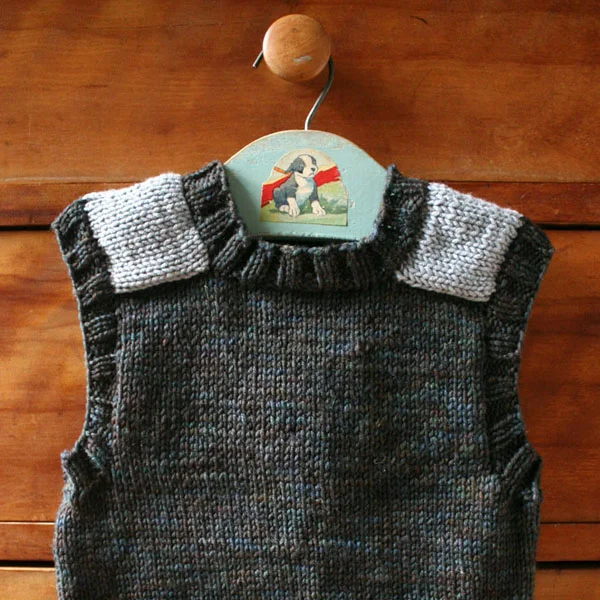
Wow, I hardly recognize my little model. It's been almost 6 years since I posted this vest pattern, and my guy just hasn't stopped growing. Of course, the three vests above no longer fit him, but they each got a lot of wear. The dark grey version (which we called his "Han Solo" vest) actually fit Milo until last year. But now he is officially without vests, and that definitely needs to change.

With a few nudges from other vest knitters, and some awesome help from Allie, the Snappy Shoulder Vest pattern is now updated to include 6, 8 and 10 year old sizes. I'm a wee bit blog-challenged these days, so instead of editing the old post, I'm simply adding the updated pattern below (the old post will include a link to get you here). Someday I hope to make PDFs of my older, free patterns, but hopefully this works for now. I'm itching to get started on a new vest for Milo, and I hope you enjoy knitting up some larger vests too!

You will need:
• Main Colour (MC): 350 (400, 475, 550, 650) yds/ 320 (365, 435, 500, 595) m worsted weight wool

• Contrast Colour (CC): 20 yds/18 m worsted to aran weight wool for shoulders (this is a great use for scrap wool!)

• US7/4.5mm needles (16” circ)

• extra US 7/4.5mm needle (for holding stitches)

• US6/4mm needles (DPNs)

• 1 stitch marker

Gauge: 19 stitches x 26 rows in stockinette = 4”/10cm square
Sizes: 2T (4T, 6, 8, 10)
Finished dimensions: 21¾ (23½, 26, 28, 29.5)” chest circumference, 14½” (16, 18.5, 21, 22)” garment length (or longer – the body is up to you!) 


SHOULDER SADDLES (make 2)
Using CC, CO 20 (20, 22, 26, 28) sts. Knit in stockinette for 14 (14, 16, 18, 20) rows and bind off on RS row. 

FRONT
Using main wool, pick up 12 (12, 13, 16, 18) stitches along vertical edge of a shoulder saddle. CO 15 (17, 19, 21, 23), then pick up 12 (12, 13, 16, 18) stitches along vertical edge of the second shoulder saddle (39 [41, 45, 53, 59] stitches on needle). Turn work and purl to end. Turn work and knit to end. Continue knitting flat in stockinette for 3” (3.5, 4, 4.5, 4.75)” ending on a WS row. Next row (RS): Knit to end, CO2. Next row (WS): Purl to end, CO2. Next row (RS): Knit across 43 (45, 49, 57, 63) stitches and transfer to spare 4.5mm needle. 

BACK
This time, it’s much easier to see where you are picking up stitches, because the shoulder saddles are already in place. So, using your main wool, pick up 12 (12, 13, 16, 18) stitches along remaining vertical edge of a shoulder saddle. CO 15 (17, 19, 21, 23) then pick up 12 (12, 13, 16, 18) stitches along vertical edge of the second shoulder saddle (39 [41, 45, 53, 59] stitches on needle). Turn work and purl to end. Turn work and knit to end. Continue knitting flat in stockinette for 4” (4.5, 5.5, 5.5, 5.75)” ending on a WS row. Next row (RS): Knit to end, CO2. Next row (WS): Purl to end, CO2. Turn work. Now you’re ready to join in the round. 

BODY
Knit across 43 (45, 49, 57, 63) stitches, CO 9 (11, 13, 9, 9), knit across the FRONT 43 (45, 49, 57, 63) stitches from your spare needle, and CO 9 (11, 13, 9, 9). You should have 104 (112, 124, 132, 144) stitches in total. Join in the round and sit back for some relaxing, mindless knitting. The body length is truly up to you – I knit in stockinette for 6 (7, 8.75, 10.5, 11)”. 

BOTTOM
[K2, P2] ribbing for 2.5” and bind off loosely. 

NECKBAND
You can easily tell the front of the vest because the neckline is lower. Using 4mm DPNs and your main wool, pick up 17 (21, 23, 25, 27) stitches across the back neckline of the vest, 17 (17, 19, 23, 25) across one saddle, 17 (21, 23, 25, 27) across the front neckline, and another 17 (17, 19, 23, 25) across the remaining saddle (68 [76, 84, 96, 104] stitches total). PM and [K2, P2] for 5 rows. Bind off loosely. 

LEFT ARMHOLE
Using 4mm DPNs and your main wool, determine the bottom center of the armhole and pick up 18 (21, 25, 27, 29) stitches from this point until you reach the shoulder saddle. Pick up 17 (17, 19, 23, 25) stitches across saddle, then 21 (26, 30, 32, 32) stitches along the back (56 [64, 74, 82, 86] stitches total). PM and [K2, P2] for 5 rows. Bind off loosely. 

RIGHT ARMHOLE
Using 4mm DPNs and your main wool, determine the bottom center of the armhole and pick up 21 (26, 30, 32, 32) stitches from this point until you reach the shoulder saddle. Pick up 17 (17, 19, 23, 25) stitches across saddle, then 18 (21, 25, 27, 29) stitches down the front (56 [64, 74, 82, 86] stitches total). PM and [K2, P2] for 5 rows. Bind off loosely. 

Weave in all ends and block if desired. Find your favourite little person and keep them toasty warm in their newest vest! 

Samantha Lamb Comments
wellington worksock shawl
wellington collage.jpg

Darn Instagram! I have become so used to sharing stories and progress there, that I didn't even add this pattern here. A pattern I published last winter, no less! All I can say is: oops.

This is the Wellington Worksock Shawl, named for a town in my favourite area of Ontario and to reference the classic wool work sock which inspired the shawl's design. The shawl's triangular construction is simple and straightforward because the big fun is in choosing your colour combination. I'm still a huge fan of Brooklyn Tweed's Shelter line, and their palette is just so perfect for this shawl. The samples above were knit with Postcard, Fossil and Sweatshirt (left, middle) and Sweatshirt, Fossil and Camper (right).

But to be honest, I'm most excited by all the yarn options and colour combinations that other knitters have come up with - which is exactly why producing patterns is so rewarding. Sharing written instructions with others and seeing how they bring those words to life with needles and string?

It's pure magic.

Samantha LambComment